One of the great advantages of using Bluetooth is that it is right there on your mobile phone and many Linux Single Board Computers (SBC) so it is no surprise that people want to connect these two types of devices.
For people with Android devices there is quick and simple way to create mobile phone apps using MIT’s App Inventor http://appinventor.mit.edu/explore/
However by default SBC’s do not support the required Bluetooth Profile.
There are numerous different Profiles (or sometimes called services) a Bluetooth Classic device can use to communicate over the lower level Bluetooth protocols. These predefined profiles ensure both ends of the bluetooth link are talking the same dialect of Bluetooth. For interfacing with App Inventor your SBC needs to use the Serial Port Profile (SPP).
This article will focus on using Python to set up the SBC as a Bluetooth Serial Port Profile server.
The low level Bluetooth configuration and communication on Linux is taken care of by BlueZ. There is an Application Programming Interface (API) defined for how to interact with BlueZ from your application code.
The API uses the Linux DBus software communication bus. Not something we have to know too much about as there are some standard libraries around that we can use.
We can install one for Python 3 as follows:
sudo apt-get install python3-dbus
As I have mentioned previously, by default most SBC’s does not have the SPP service defined so we have to tell the Bluetooth Daemon (bluetoothd) that we would like this service.
We do this by defining a Python class with three methods (NewConnection, RequestDisconnection and Release) and then finally we need to tell the Bluetooth Daemon where our Python class is on the DBus Software Bus.
Firstly we have our ‘library’ part of the code that will take care of creating the SPP and reading and writing the information. This should be base code that we can use over and over again on different projects.
import os
import dbus
import dbus.service
import dbus.mainloop.glib
try:
    from gi.repository import GObject
except ImportError:
    import gobject as GObject

dbus.mainloop.glib.DBusGMainLoop(set_as_default=True)

bus = dbus.SystemBus()


class Profile(dbus.service.Object):
    fd = -1

    def __init__(self, bus, path, read_cb):
        self.read_io_cb = read_cb
        dbus.service.Object.__init__(self, bus, path)

    @dbus.service.method('org.bluez.Profile1',
                         in_signature='',
                         out_signature='')
    def Release(self):
        print('Release')
        mainloop.quit()

    @dbus.service.method('org.bluez.Profile1',
                         in_signature='oha{sv}',
                         out_signature='')
    def NewConnection(self, path, fd, properties):
        self.fd = fd.take()
        print('NewConnection(%s, %d)' % (path, self.fd))
        io_id = GObject.io_add_watch(self.fd,
                                     GObject.PRIORITY_DEFAULT,
                                     GObject.IO_IN | GObject.IO_PRI,
                                     self.io_cb)


    @dbus.service.method('org.bluez.Profile1',
                         in_signature='o',
                         out_signature='')
    def RequestDisconnection(self, path):
        print('RequestDisconnection(%s)' % (path))

        if self.fd > 0:
            os.close(self.fd)
            self.fd = -1

    def io_cb(self, fd, conditions):
        data = os.read(fd, 1024)
        self.read_io_cb('{0}'.format(data.decode('ascii')))
        return True

    def write_io(self, value):
        try:
            os.write(self.fd, value.encode('utf8'))
        except ConnectionResetError:
            self.fd = -1


class SPP:

    def __init__(self, read_cb):
        self.profile = None
        manager = dbus.Interface(bus.get_object('org.bluez',
                                                '/org/bluez'),
                                 'org.bluez.ProfileManager1')

        self.mainloop = GObject.MainLoop()
        adapter_props = dbus.Interface(bus.get_object('org.bluez', '/org/bluez/hci0'),
                                       'org.freedesktop.DBus.Properties')

        adapter_props.Set('org.bluez.Adapter1', 'Powered', dbus.Boolean(1))
        profile_path = '/foo/bar/profile'
        server_uuid = '00001101-0000-1000-8000-00805f9b34fb'
        opts = {
            'AutoConnect': True,
            'Role': 'server',
            'Channel': dbus.UInt16(1),
            'Name': 'SerialPort'
        }

        print('Starting Serial Port Profile...')

        if read_cb is None:
            self.profile = Profile(bus, profile_path, self.read_cb)
        else:
            self.profile = Profile(bus, profile_path, read_cb)

        manager.RegisterProfile(profile_path, server_uuid, opts)

    def read_cb(self, value):
        print(value)

    def write_spp(self, value):
        self.profile.write_io(value)

    def fd_available(self):
        if self.profile.fd > 0:
            return True
        else:
            return False

    def start(self):
        self.mainloop.run()
With Bluetooth Classic there is a need to pair your Android phone and the SBC. There are numerous ways this can be done. I’m going to describe using bluetoothctl as this can be used even if you are running your SBC ‘headless’ and don’t have the full desktop environment.
We are going to make the phone the ‘master’ which means it will scan and discover the SBC. For this to happen we need to make the SBC discoverable and pairable.
$ bluetoothctl
[bluetooth]# power on
Changing power on succeeded
[bluetooth]# agent KeyboardDisplay
Agent registered
[bluetooth]# default-agent
Default agent request successful
[bluetooth]# discoverable on
Changing discoverable on succeeded
[CHG] Controller B8:27:EB:22:57:E0 Discoverable: yes
[bluetooth]# pairable on
Changing pairable on succeeded
[NEW] Device 64:BC:0C:F6:22:F8 Nexus 5X
Request confirmation
[agent] Confirm passkey 910035 (yes/no): yes
when you start the server this happens
Authorize service
[agent] Authorize service 00001101-0000-1000-8000-00805f9b34fb (yes/no): yes
[Nexus 5X]# trust
[CHG] Device 64:BC:0C:F6:22:F8 Trusted: yes
Changing  trust succeeded
Below is a sample app that will be running on our SBC that will send the temperature of the cpu every 1 second to the phone when it is connected.
Anything that is sent from the phone app to the SBC will be printed to the screen.
#!/usr/bin/python3

from gi.repository import GObject
import os
import spp_server


def my_read_cb(value):
    print('my callback: {}'.format(value))


def my_write_cb(my_server):
    cpu_temp = os.popen('vcgencmd measure_temp').readline()
    if my_server.fd_available():
        my_server.write_spp('{}'.format(float(cpu_temp.replace('temp=', '').replace("'C\n", ''))))
        print('Sending: {}'.format(float(cpu_temp.replace('temp=', '').replace("'C\n", ''))))
    return True

if __name__ == '__main__':
    my_spp_server = spp_server.SPP(my_read_cb)
    GObject.timeout_add(1000, my_write_cb, my_spp_server)
    my_spp_server.start()
There is a more detailed tutorial for creating App Inventor Bluetooth applications available at:
http://pevest.com/appinventor2/?p=520
Below I will outline the key pieces I have done for the various functions.
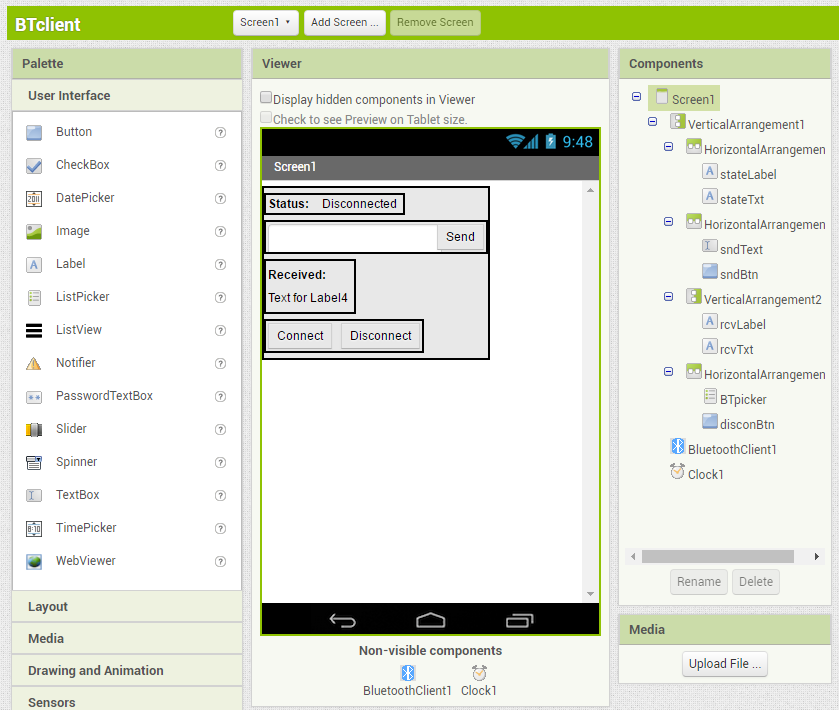
We need to ensure we have the “BluetoothClient1” as this will give us access to the Bluetooth functional blocks that we need.
The reading of incoming data will be done on a timer so we also need the “Clock1” component.
We are going to add a label to display that status of the connection and any data received. There are buttons to disconnect from the SBC as well as a button to send the data from the text box.
For the connect we will use a “picker” object so we can choose from the list of devices already connected.
Now we have the basic layout of our app we can move on to putting the functionality behind the GUI
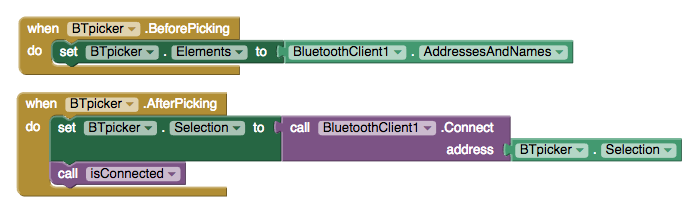
We will use two events on the picker. The ‘BeforePicking’ is to populate the picker with the list of Bluetooth devices that are already paired with our phone.
The ‘AfterPicking’ event will try to connect to our selected device.
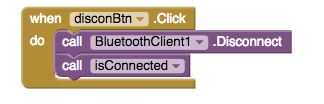
A simple button to disconnect from the SBC.
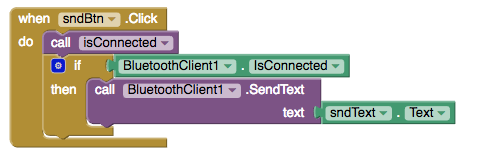
When we press the send button, check we are connected and if we are send the data from the text box
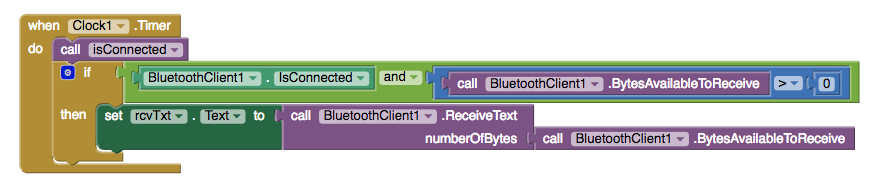
This event will trigger every second. If we are connected and there is data to read then display it in the recTxt section. If we want to change how frequently this attempts to read then we need to go back to the designer page of App Inventor to change the properties of the Clock1 component.
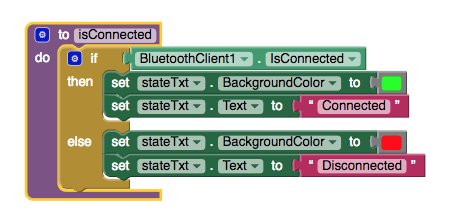
Finally, we have created a component that we can call in each of the events above to update our status label.
Now we have our Python code running and we have our phone app created we need to connect.
The SBC should be sat there patiently waiting for a connection so on the phone launch your app and select connect. If you have successfully paired your phone earlier your SBC should be in the list.
Once you select the device the connect should happen and you should see output in both your terminal window where you started the Python code and in the app.
Now you can try sending some text from the phone and see if it appears on the SBC.
I’ve tried to make this code very minimal to aid understanding. The downside of that is it is easy to get an error and for things to fall over so that is one area of improvement.
The other obvious things is make things happen when the commands are sent. Turn LEDs on and off or even control a robot. This could be with buttons or using the sensors on your phone that App Inventor gives you access to.
Going the other way, attach sensors to your SBC and send them to your phone. Maybe a moisture sensor for your favourite plant to see if it needs watering...